Python Implementation of DriveWire 4 and EmCee Protocols
PyDriveWire is a nearly complete DriveWire4 Server written in Python. The goal is to eventually implement all of the features available. The server also implements additional features that are not available in DriveWire4.
PyDriveWire also has support for the EmCee Protocol for use with MCX Basic on the TRS-80 MC-10.
DriveWire 4 and EmCee Procotols can be used simultaneously on the server without reconfiguration.
dw config show commanddw config save commanddw disk create command--ui-port)pyDwCli command console tooldw server dir and dw server list enhanced to run on ALL OSes (Mac/Windows/Linux, etc)dw commmands over vportAT Modem-style connectionsATD/ATDT or tcp connecttcp listen/join/kill commands/Z console windowspyDriveWire has two Easy Installtion Methods: Binary Package and Docker. These options are designed for Ease Of Use and do not require a complex series of installation steps. pyDriveWire can also be run directly from any pypy or python install if it meets the appropriate requirements.
In terms of performance, the Python and Binary Package installation methods are fully functional but have the lowest performance. Docker provides a medium level of performance. pypy should be used to get the maximum performance out of pyDriveWire.
Binary packages are available at the following location:
https://github.com/n6il/pyDriveWire/releases/latest
Packages are available for the following operating systems:
linux-x86_64 -- Any modern 64-bit Linux win-x64 -- 64-bit Windows (Windows 7 or later)win32 -- 32-bit Windows (Windows 7 or later)rpi3 -- Raspberry Pi 3 (Raspbian Buster)rpi4 -- Raspberry Pi 4 (Raspbian Jesse)macOs -- macOs (High Sierra or later)Using a Binary Package is very simple:
pyDriveWire and pyDwCli and a copy of this manual.pyDriveWire executable. See next section for examples:Example: Run pyDriveWire with the HTTP UI on port 6800 and use a serial port:
pyDriveWire --ui-port 6800 --port /dev/ttyUSB0 --speed 460800Example: Run pyDriveWire with the HTTP UI on port 6800 and use a serial port and mount two disk images:
pyDriveWire --ui-port 6800 --port /dev/ttyUSB0 --speed 460800 \
    /demo/test1.dsk /demo/test2.dsk
Example: Run pyDriveWire with the HTTP UI on port 6800 and the Becker port connection on port 65504:
pyDriveWire --ui-port 6800 --accept --port 65504docker pull mikeyn6il/pydrivewireExample: Run pyDriveWire with the HTTP UI on port 6800 and use a serial port:
docker run -i -p 6800:6800/tcp -p 65504:65504/tcp \
    --device /dev/ttyUSB0:/dev/ttyUSB0 mikeyn6il/pydrivewire:latest \
    --ui-port 6800 --port /dev/ttyUSB0 --speed 460800
For Windows use the following --device option:
--device COM4:/dev/ttyUSB0Example: Run pyDriveWire with the HTTP UI on port 6800 and use a serial port and use a HTTP disk image:
docker run -i -p 6800:6800/tcp -p 65504:65504/tcp \
    --device /dev/ttyUSB0:/dev/ttyUSB0 mikeyn6il/pydrivewire:latest \
    --ui-port 6800 --port /dev/ttyUSB0 --speed 460800 \
    http://www.ocs.net/~n6il/DWTERM.dsk
Example: Run pyDriveWire with the HTTP UI on port 6800 and the Becker port connection on port 65504:
docker run -i -p 6800:6800/tcp -p 65504:65504/tcp \
    mikeyn6il:pydrivewire/latest \
--ui-port 6800 --accept --port 65504brew install pypy; pypy -m pip install pyserialapt-get install pypy; pypy -m pip install pyserialExperimental Printing Support
pypy -m pip install reportlabThere are multiple ways to get Python and pyDriveWire installed on Windows. As long as the basic requirements are met you can use any method to install PyPy or Python. The requirements and two fully-tested example installation workflows are below.
The instructions below direct you to install the latest stable release
from the GitHub releases page. If you would like to try out or help to
test the latest pyDriveWire code you can obtain pyDriveWire from it's
develop branch. You can download a static zip file from GitHub or clone
the repository and switch to the develop branch.
We're more than happy to accept merge requests or bug reports for any version you are trying.
C:\Program Files (x86) folder\bin to the endpypy get-pip.pypip install pyserialpyDriveWire.bat batch file you can run.
Earlier versions can be started from the command prompt: pypy
pyDriveWire.py <options>C:\ so the path is either C:\msys64 or C:\msys32mingw64 shellwget https://bootstrap.pypa.io/get-pip.pypython get-pip.pypip install pyserial./pyDriveWire <options>This manual section is meant as a quick and comprehensive guide to all of the pyDriveWire configuraiton options. Many of the options have a detailed manual page which describes that individual feature. There will be a link to those pages.
usage: pyDriveWire.py [-h] [-s SPEED] [-a] [-c] [-H HOST] [-p PORT] [-R]
                      [-x EXPERIMENTAL] [-D CMDPORT] [-U UIPORT] [-C CONFIG]
                      [--daemon] [--status] [--stop]
                      [--pid-file DAEMONPIDFILE] [--log-file DAEMONLOGFILE]
                      [--debug] [--version] [--hdbdos] [--offset OFFSET]
                      [--print-format {pdf,txt}]
                      [--print-dir PRINTDIR | --print-file PRINTFILE]
                      [--print-cmd PRINTCMD]
                      [FILE [FILE ...]]

pyDriveWire Server v0.6

positional arguments:
  FILE                  list of files

optional arguments:
  -h, --help            show this help message and exit
  -s SPEED, --speed SPEED
                        Serial port speed
  -a, --accept          Accept incoming TCP connections on --port
  -c, --connect         Connect to TCP connections --host --port
  -H HOST, --host HOST  Hostname/IP
  -p PORT, --port PORT  Port to use
  -R, --rtscts          Serial: Enable RTS/CTS Flow Control
  -x EXPERIMENTAL       experimental options
  -D CMDPORT, --cmd-port CMDPORT
                        Remote dw command input
  -U UIPORT, --ui-port UIPORT
                        pyDriveWire UI Port
  -C CONFIG, --config CONFIG
                        Config File
  --daemon              Daemon Mode, No Repl
  --status              Daemon Status
  --stop                Daemon Status
  --pid-file DAEMONPIDFILE
                        Daemon Pid File
  --log-file DAEMONLOGFILE
                        Daemon Log File
  --debug, -d
  --version, -v
  --hdbdos              HDBDos Mode
  --offset OFFSET       Number of sector offset for sector 0

printer:
  Printer Options

  --print-format {pdf,txt}
                        Printer output format, default: pdf
  --print-dir PRINTDIR  Spool directory to send printer output
  --print-file PRINTFILE
                        File to send printer output, Note: Will be overwritten
--print-cmd PRINTCMD Command to run on flushed printer outputDisk images you wish to mount can be specified from the command line or config file.
On the command line you can specify any number of disk images to be mounted at the time that the server starts up. The first image listed is attached to Drive 0, next is Drive 1, etc. If none are not specified no disk images will be mounted.
./pyDriveWire [server_options] [<path/to/drive_0_image.dsk> [<DRIVE0_IMG_OPTIONS>] [<path/to/drive_1_image.dsk> [<DRIVE1_IMG_OPTIONS>] ...<path/to/drive_0_image.dsk> -- This is the path to the disk image to be mounted in Drive 0. It can be full or relative path or a URL.<DRIVE0_IMG_OPTIONS> -- options for drive0image.dsk<path/to/drive_1_image.dsk> -- This is the path to the disk image to be mounted in Drive 1. It can be full or relative.<DRIVE0_IMG_OPTIONS> -- options for drive1image.dskYou can specify between 0-256 disk images.
Mount DWTERM.dsk in Drive 0:
./pyDriveWire [server_options] /demo/DWTERM.dskDownload DWTERM.dsk from a web server and mount it in Drive 0:
./pyDriveWire [server_options] http://www.ocs.net/~n6il/DWTERM.dskMount test.dsk in Drive 0 and download DWTERM.dsk from a web server and mount it in Drive 1:
./pyDriveWire [server_options] /demo/test.dsk http://www.ocs.net/~n6il/DWTERM.dskDisk image options can be specified after each disk image path in the following format:
Mount DWTERM.dsk in Drive 0 and mark it read-only
./pyDriveWire [server_options] /demo/DWTERM.dsk --roStream a disk image off of a web server
./pyDriveWire [server_options] http://www.ocs.net/~n6il/DWTERM.dsk --streamMount test.dsk in Drive 0 Read-Only, and Stream cocoserve.dsk in Drive 1.
/pyDriveWire [server_options] /demo/test.dsk opt=ro http://www.ocs.net/~n6il/DWTERM.dsk --streamThe following disk image options options are supported:
ro -- Read-Only disk imagestream -- Only useful for HTTP connections. The disk image will not be downloaded to the local server. Instead each sector will be loaded from the HTTP server on-demand whenever the CoCo asks for it.The pyDriveWire config file can be used to set all of the command line options. This section tells you where to put the config file and how to specify it on the command line. The details of the config file itself are in the Using a Config File section of this manual.
The config file can either be in a default location or can be specified from the command line.
Please see the pyDriveWire Config File and Using Multiple Instances guides for more detail about the config file.
Note: Command line options have prescidence over config file. This means that if both are specified the command line version will be used.
Note: Options are noted as either instance specific (instance) or global (global). Global options can only be specified in Instance 0.
The default location for the config file is in your home directory: ~/.pydrivewirerc
/home/<userid>/.pydrivewirerc/Users/<userid>/.pydrivewirercC:\Users\<userid>\.pydrivewirercNote: This option cannot be specified in a config file
-C <config_file>or
--config <config_file> pyDriveWire will start a server instance which listens for the DriveWire or EmCee client on <serial_port> at <baud>
/dev/ttyUSB0COM1--port <serial_port> --speed <baud>or
-p <serial_port> -s <baud>`option port <serial_port>
option speed <baud>Serial Port mode also supports RTS/CTS flow control.
Note: DO NOT use RTS/CTS with a CoCo or MC-10 Bit Banger port. This is intended for use with a UART that properly implements flow control. The RS-232 Pak or any device with a 6551 UART does not implement flow control properly.
-Ror
--rtsctsoption rtscts [True|False]Note: Omitting this option line defaults to False
pyDriveWire will start a server instance which listens for the DriveWire or EmCee client on <tcp_port>. Note that only one client can connect to each port.
--accept --port <tcp_port>or
-a -c <tcp_port>option accept True
option port <tcp_port>pyDriveWire will start a server instance which makes an outgoing TCP connection to <hostname>:<tcp_port>. Once that connection has been established pyDriveWire will listen for DriveWire or EmCee commands on that connection. This is useful for many Telnet-To-Serial bridge devices.
--connect --host <hostname> --port <tcp_port>or
-c -H <hostname> -p <tcp_port>option accept True
option port <tcp_port>pyDriveWire will automatically attempt to reconnect outgoing TCP connections. This can be disabled if desired.
--noreconnectoption noreconnect TruepyDriveWire has a Web/HTTP User Interface. See the Web User Interface manual for more details.
-U <ui_port>or
--ui-port <ui_port>option uiPort <ui_port>The Debugging option on the command line or config file is global and is applied to All Instances. See the Debugging section for detail.
Note: The config file option must be put in Instance 0.
option debug 0-d option debug 1-dd option debug 2Detailed manual for Daemon Mode
Note: If you are using a config file it is recommended to put the pid file and log file options in the config file and to run the server with --daemon -C <config_file>
Note: If your config file is in the default location you do not need to specify it on the command line
option daemonPidFile <pid_file>
option daemonLogFile <log_file>With Config File in default location:
--daemonSpecify config file location:
--daemon [-C <config_file>]Without Config File:
--daemon [--pid-file <pid_file> --log-file <log_file>]Note: Either the config file or pid file option is required.
Note: This option cannot be specified in a config file
Note: If your config file is in the default location you do not need to specify it on the command line
With Config File in default location:
--statusSpecify config file location:
--status [-C <config_file>]or specify pid file location:
--status [--pid-file <pid_file>]Note: Either the config file or pid file option is required.
Note: This option cannot be specified in a config file
Note: If your config file is in the default location you do not need to specify it on the command line
With Config File in default location:
--stopSpecify config file location:
--stop [-C <config_file>]or specify pid file location:
--stop [--pid-file <pid_file>]Please see the Experimental Printing Support manual section for more detail about this feature.
-x printeror
--experimental printeroption experimental printertxt or pdfPlease see the Experimental Printing Support manual section for more detail about this feature.
--print-format <txt|pdf>option printFormat <txt|pdf>Please see the Experimental Printing Support manual section for more detail about this feature.
--print-file <filename>option printFile <filename>Please see the Experimental Printing Support manual section for more detail about this feature.
--print-dir <directory>option printDir <directory>Please see the Experimental Printing Support manual section for more detail about this feature.
--print-prefix <directory>option printPrefix <directory>Please see the Experimental Printing Support manual section for more detail about this feature.
--print-cmd <CMD>option printCmd <CMD>
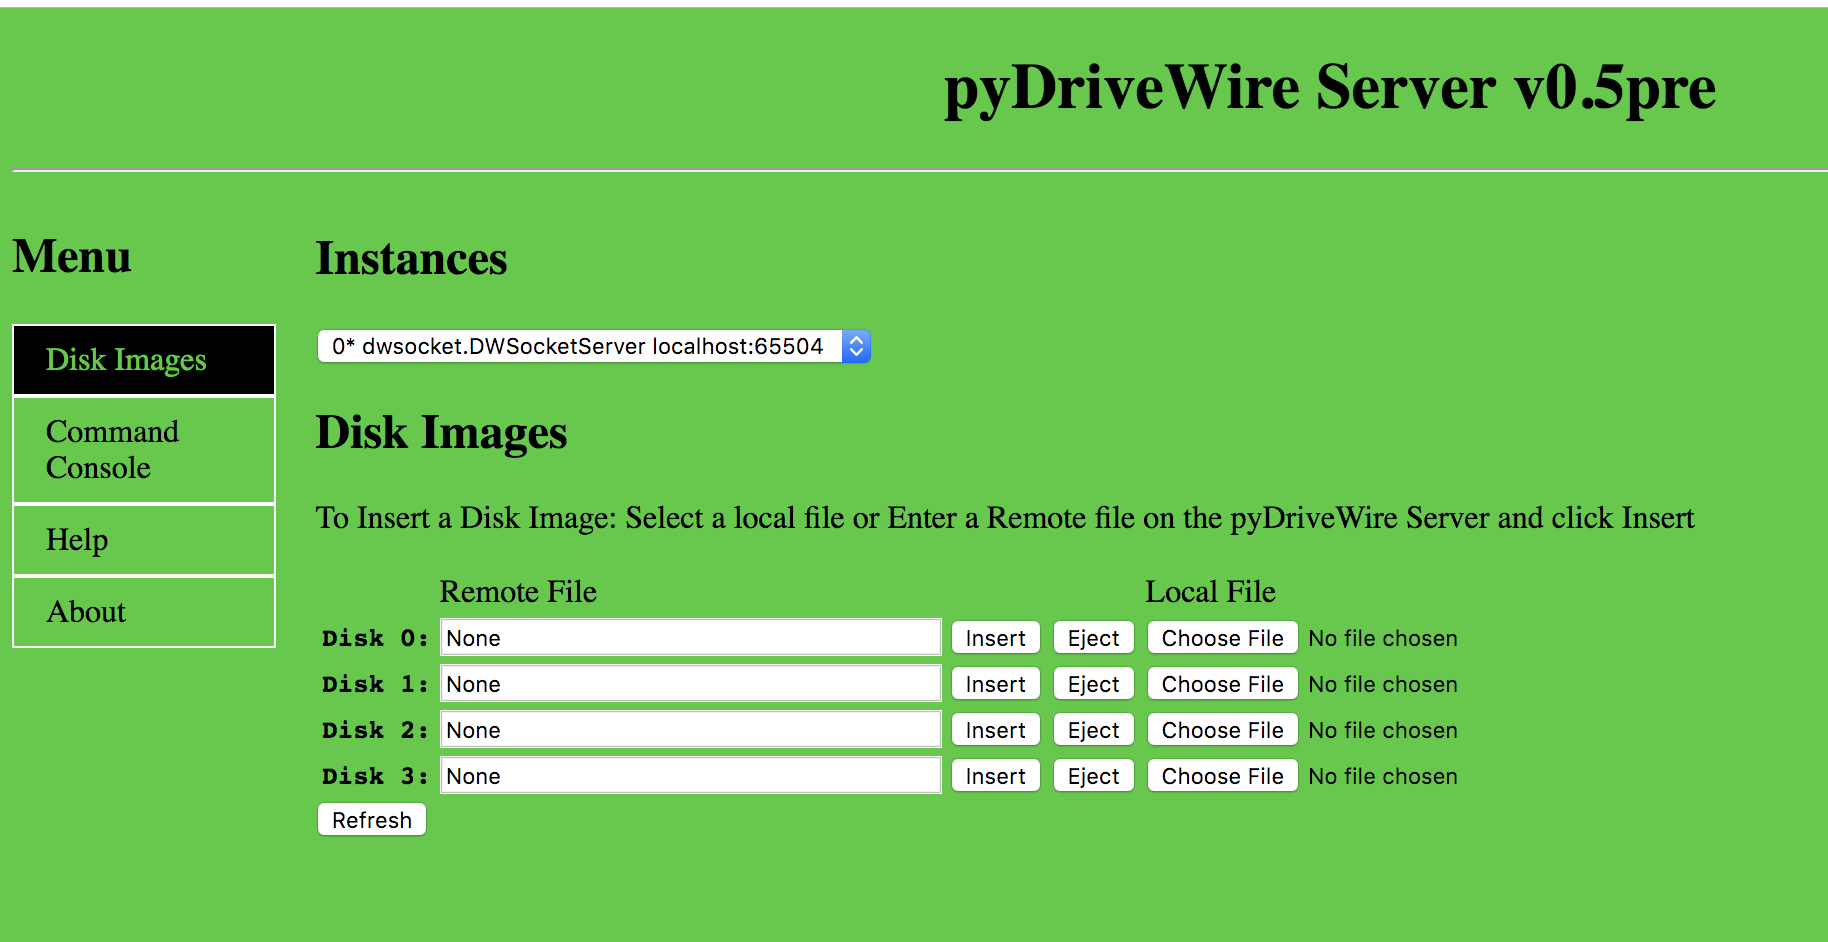
The Disk Images screen allows you to manage which disk images are mounted in the pyDriveWireServer.

The Instance Selector allows you to change the current instance. The instance changes immediately upon selection and the Disk Images Box (2) is automatically updated.
Note: If there is only one instance this pull down will now show up.
Each line in the Disk Images Section has a text box (2) for each virtual disk on the server. The text box shows the currently mounted disk image or None if no disk is mounted.
The Remote File Box can accept the following types of input:
Example: A file path:
/tmp/DWTERM.dskExample: A URL:
http://www.ocs.net/~n6il/DWTERM.dsk**Note: This box shows the location of the disk image on the pyDriveWire Server which may be a different location than the Local File (5)**
Clicking the Insert button will mount the file named in the adjacent Remote File Input Box (2).
To Eject a disk image click the Eject button. The Remote File Box (2) will change to None.
To Mount a disk image which resides on the local computer, click the Choose File button. A file selection dialog box will pop up. The selected file is automatically uploaded to the pyDriveWire server
To refresh the currently mounted disk images click the Refresh button.
The Command Console screen allows you to run commands on the pyDriveWire server and also shows all the commands that have been run on the server by the user interface.
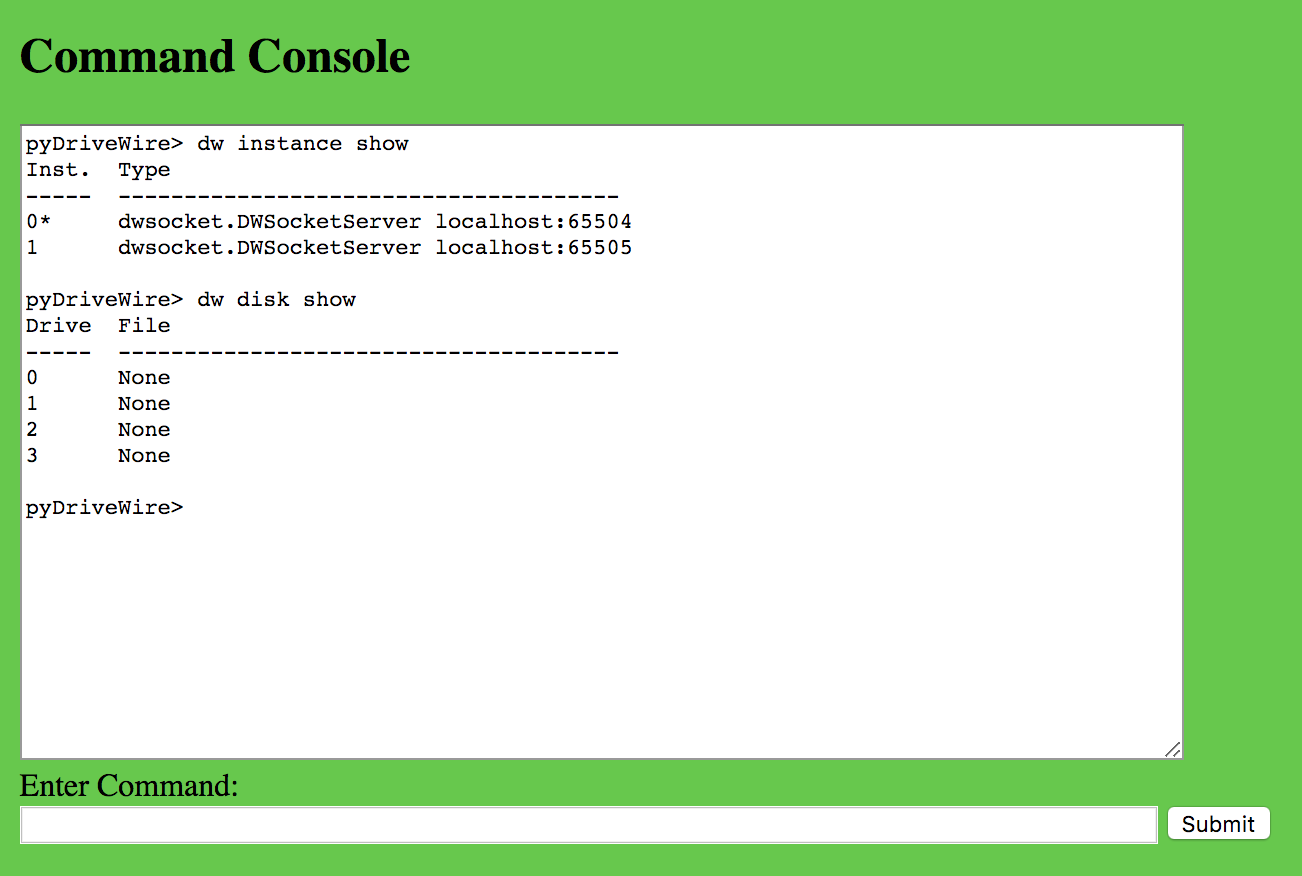
The screen has 2 parts: A scollable window with all the commands and command output, and second text box to enter commands and a button submit those commands to the server
The command window is designed to be interactive so that you can easily explore the available commands without looking up in the manual. Please see the Command Console Interfaces manual section for more detail.
pyDriveWire can be controlled in multiple ways by using different Command Console Interfaces. Those interfaces are:
dw commandIf you are a command line person this is for you. If the pyDriveWire server is invoked without Daemon Mode it will start up what is called a "REPL" (Read Execute Print Loop) command console interface. This is a fancy way of saying that it prints a prompt and waits for your input.
Suppose you started pyDriveWire as follows:
./pyDriveWire --accept --port 65504 /demo/DWTERM.dskIf you hit enter on this command pyDriveWire will print some initialization info and then Greet you with a command prompt where you can type any DriveWire Command:
$ ./pyDriveWire -C /tmp/empty --accept --port 65504
Accept connection on 65504
<dwsocket.DWSocketServer instance at 0x0000000106d22ea0>: Starting _readHandler...
accepting

****************************************
* pyDriveWire Server v0.6
*
* Enter commands at the prompt
****************************************

pyDriveWire> _
Simply type your commands at this prompt. See the tutorial below.
pyDwCli is a standalone command line tool which you can use to control the pyDriveWire server.
To use pyDwCli you must set up the WebUI. See the Web User Interface manual section for a bit more detail on this, but in short you either put the option in your Config File
option uiPort 6800or from the comand line:
./pyDriveWire --ui-port 6800 [...]Once the Web UI is running you can use the pyDwCli.
pyDwCli has 2 modes: Interactive Mode and Single Command Mode
To run in the pyDwCli Interactive/REPL mode, you would run it as follows. Change localhost and 6800 to the correct hostname and port number:
$ ./pyDwCli http://localhost:6800
pyDriveWire>  dw disk show

Drive  File
-----  --------------------------------------
0      None
1      None
2      None
3      None
pyDriveWire>
and you can type any DriveWire commands at the prompt. Type quit to exit:
pyDriveWire> quit
Bye!
$
pyDwCli can also run a single optional command specified on the command line. This is useful for scripting control of pyDriveWire:
$ ./pyDwCli http://localhost:6800 dw instance show

Inst.  Type
-----  --------------------------------------
0*     dwsocket.DWSocketServer localhost:65504
1 dwsocket.DWSocketServer localhost:65505Suppose the user doesn't know what command to type and just typed help:
pyDriveWire> help
: Invalid command: help
commands: dw tcp AT ui mc
The server responded that help is not a valid command but it listed out the valid possible command prefixes dw tcp AT ui mc. The user continues their exploration:
pyDriveWire> dw
dw: Invalid command: dw
dw commands: disk server port
Here the user typed dw and the server responded with all of the available commands under dw. If the user was interested in disk operations they could type dw disk to see what sub commands are available:
pyDriveWire> dw disk
disk: Invalid command: disk
disk commands: insert reset eject show
The user is interested to show what disk images are mounted so this time the issued the full command:
pyDriveWire> dw disk show


Drive  File
-----  --------------------------------------
0      /Users/mfurman/Downloads/plato.dsk
1      None
2      None
3      None
If you already know the command you want you can of course type it directly without going through the exploratory steps above.
pyDriveWire accepts options from either the command line or a config file. There are two ways to provide a config file to pyDriveWire:
-C <cfgFile> or --config <cfgFile> command line options~/.pydrivewirercIf the config file exists it is read in. Options are applied to the config and commands are run through the command parser.
Note: If both command line options and a config file are provided the command line options override the config file options
The config file has two different types of options
Options -- Option entries can be used to set any of the command line options to pyDriveWire. Options always start with the word option and have the following format:
option <optionName> <optionValue>Commands -- are any lines in the config file that are not options, instance tags, or comments. These are standard pyDriveWire commands and they are run through the command parser immediately on start-up.
dw disk insert 0 /demo/DWTERM.dskInstance Tags -- Tags are used to tell pyDriveWire that you want multiple instances. Please see the Multiple Instances manual section for more detail on how to configure this feature.
[second instance]Comments -- are any lines where the first non-whitespce character is a #
# This is a comment# options
option accept True
option port 65504
option uiPort 6800
# commands
dw disk insert 0 /demo/DWTERM.dskFor a full description of all the config file options please see the Command Line and Config File Options guide.
option accept True
option port 65504option connect True
option host 127.0.0.1
option port 23option port /dev/tty.usbserial
option speed 115200option uiPort 6800use with --daemon command line option
option daemonPidFile /tmp/pyDriveWire.pid
option daemonLogFile /tmp/pyDriveWire.logoption debug <0|1|2>pyDriveWire allows you to configure and use multiple instances which all run in parallel. Each instance talks to one DriveWire client and each can mount different disk images. The instances are configured in a config file to specify the connection point and any options you wish to set for for each instance.
Note: At the current time instances can only be specified in the config file and can only be started or stopped along with the main invocation of pyDriveWire.
Instances are configured in a pyDriveWire Config file.
The options and commands for first instance instance 0 starts at the top of the config file and includes any lines which are not comments or blank lines. The main instance commands and options stop at the first instance tag.
Additional instances can be added by adding an instance tag:
[serial]The name of the instance is for you to know what it's for, the server doesn't use it.
Instances are numbered sequentially. The first instance is always instance 0. The instance following that one is instance 1, etc.
Options and commands for the instance start after the instance tag and continue until the next instance tag.
Multiple instances can be specified.
# Main Instance
option accept True
option port 65504
option uiPort 6800
dw disk insert 0 /demo/plato.dsk

[serial]
option port /dev/ttyS0
option speed 115200
dw disk insert 0 /demo/DWTERM.dsk

[connect]
option connect True
option host mfurman-a01.local
option port 54321
Instance 0 listens on port 65504 for incoming connections and is mounting a disk image.
Instance 1 uses a serial port at 115200 baud and also mounts a disk image
Instance 2 makes an outgoing TCP/IP connection to the specified host and port.
pyDriveWire has a few commands to control instances. These commands should only be used from the command line interface, the web interface, or pyDwCli.
Note: Using instance commands from a DriveWire Client is not recommended.
dw instance showdw instance select <inst>dw instance showShows a list of the currently configured instances. The current instance is marked with an asterisk *:
pyDriveWire(0)>  dw instance show


Inst.  Type
-----  --------------------------------------
0*     dwsocket.DWSocketServer localhost:65504
1      dwserial.DWSerial /dev/ttyS0 115200
2      dwsocket.DWSocket mfurman-a01.local:54321
dw instance select <inst>Switches to a different instance.
pyDriveWire(0)>  dw instance select 1
Selected Instance 1: dwserial.DWSerial /dev/ttyS0 115200
pyDriveWire(1)>
The server will respond with a line telling you which instance you just switched to. The command prompt will also change to show the current instance. You can see in the example above that the original prompt was instance 0 and it switched to instance 1.
When pyDriveWire is run on any Linux/Unix/macOs operating system it can be run in a daemon mode where the server in the background in a "daemon" mode. When run in this mode there is no console repl and you must use either the Web UI or pyDwCli to control it.
Note: This mode is not supported on Windows
Daemon mode can be enabled from either the config file or from the command line. You do not need to specify both but you can. Note that if you do specify both the config file parameters will override the command line ones.
The easiest way to use Daemon mode is to create a config file (See Using a Config File) and put the following options in it in instance 0:
option uiPort 6800
option daemonPidFile /tmp/pyDriveWire.pid
option daemonLogFile /tmp/pyDriveWire.log
[... additional options required ...]
With the config file in the default location of ~/.pydrivewirerc you can then start the pyDriveWire server in daemon mode with a single option:
./pyDriveWire --daemonExample: Daemon mode is not running
$ ./pyDriveWire --status
pyDriveWire Server status:notRunning
Example: Deamon mode is running
$ ./pyDriveWire --status
pyDriveWire Server pid:1114 status:Running$ ./pyDriveWire --status
pyDriveWire Server pid:1114 status:Running
$ ./pyDriveWire --stop
pyDriveWire Server pid:1114 msg:Stopped
$ ./pyDriveWire --status
pyDriveWire Server status:notRunningThe server can be invoked as follows from the command line:
./pyDriveWire \
        --ui-port 6800 \
        --daemon \
        --pid-file /tmp/pyDriveWire.pid \
        --log-file /tmp/pyDriveWire.log \
        [... additional required options ...]
This will start the server in daemon mode with a web UI listening on port 6800.
pyDriveWire version v0.4 adds experimental support for the EmCee protocol used on the TRS-80 MC-10 running MCX Basic (MCX Basic is available on the MCX-128 expansion card). The EmCee protocol support is always turned on allowing any application connected to a pyDriveWire server to use EmCee and DriveWire protocols simeltaneously. With this setup one could use a DriveWire application on a MC-10 or a EmCee application on a CoCo without the need to switch servers.
As of v0.4 the following MCX Basic Commands are supported:
SETDIRDIRLOADLOADMThe following file formats are supported:
.C10.CASSETDIR command works differently than the standard EmCee Server..C10 and .CAS formatted files. WAV and BIN file support is planned for a future update..C10 or .CAS file from the command line. Use the LOAD or LOADM command.The EmCee server in pyDriveWire is on by default and there are no commands to turn it on or off. The only special requirement is that You must use 38400 baud to use the EmCee protocol on a MC-10 running MCX Basic. Please see the rest of this documentation for how to invoke pyDriveWire. Once pyDriveWire is started you can use the normal MCX Basic commands to access files on the server.
SETDIR <path> - Set the directory on the server<path> -- full path name a directory on the serverThe pyDriveWire version of SETDIR is different than the normal EmCee server. You must provide a full path name to the directory you want to switch to.
SETDIR C:\Users\Mikey\MC-10SETDIR /home/Mikey/MC-10DIR [<path>] - List directory on the server<path> -- optional full path name a directory on the serverList the directory on the server. The default directory is the one where pyDrivewire was invoked. <path> is optional and must be a full path name to the directory you want to list.
DIRDIR C:\Users\Mikey\MC-10DIR /home/Mikey/MC-10LOAD <file> - Load a program from the server<file> -- .C10/.CAS file to load fromThe pyDriveWire server searches the provided .C10 or .CAS file and loads the first file in the tape image.
LOADM - Load a binary program from the server<file> -- .C10/.CAS file to load fromThe pyDriveWire server searches the provided .C10 or .CAS file and loads the first BIN file in the tape image.
The pyDriveWire server has a powerful "aliasing" system that is quite different than the official EmCee servers. The pyDriveWire system has three different types of aliases. File and Web Aliases can be with LOAD/SAVE commands and Path Aliases can be used with DIR/SETDIR commands. The official servers can only use aliases for the SETDIR command.
In the pyDriveWire server all alias names are converted to upper case. For example if you had an alias like this one:
Server Aliases
==============
Alias: DWTERM.WAV Path: /demo/dwterm.wav
The case of the alias requested from the MC-10 is always converted to upper case so any of the following would load the same alias:
LOADM "DWTERM.WAV"LOADM "dwterm.wav"LOADM "DwTeRm.WaV"The PyDriveWire Server supports the following types of Aliases:
A web alias is an alias to a HTTP URL. When the MC-10 requests the alias using a LOAD or LOADM command the URL which the alias points to will be downloaded to a temporary file and then opened normally. Note that you won't see the actual file name, and when the file is closed the temp file will be automatically deleted.
A path alias is an alias to a directory. Path aliases can be used with DIR or SETDIR commands to change to the directory pointed to by the alias.
A file alias points to a file. Full or relative pathnames could be used. When the MC-10 requests the the alias the path to which the alias points to will be used and opened normally.
See the help for mc alias show for an example.
mc alias showShow the currently installed aliases:
Server Aliases
==============
Alias: POKER.C10 Path: http://www.colorcomputerarchive.com/coco/MC-10/Cassettes/Games/Jim%20Gerrie's%20Games/POKER.C10
Alias: DEMO Path: /demo
Alias: DWTERM.WAV Path: /demo/dwterm.wav
Explanation of example Aliases:
POKER.C10 -- This is a web alias -- LOAD "POKER.C10"DEMO -- This alias is a directory alias -- SETDIR "DEMO"DWTERM.WAV -- This is a file alias -- LOADM "DWTERM.WAV"mc alias add <alias> <path>Adds the requested alias with path as the destination. The alias is always converted to upper case before addition lookup. The path that an alias points to is case sensitive. Spaces and punctuation are permitted.
Add a Web Alias:
pyDriveWire>  mc alias add poker.c10 http://www.colorcomputerarchive.com/coco/MC-10/Cassettes/Games/Jim%20Gerrie's%20Games/POKER.C10
Add Alias
==============
Alias: POKER.C10 Path: http://www.colorcomputerarchive.com/coco/MC-10/Cassettes/Games/Jim%20Gerrie's%20Games/POKER.C10
Add a file alias:
pyDriveWire>  mc alias add dwterm.wav /demo/dwterm.wav
Add Alias
==============
Alias: DWTERM.WAV Path: /demo/dwterm.wav
mc alias remove <alias>Remove an alias. The alias is always converted to upper case before addition removal.
pyDriveWire>  mc alias remove qbert.c10
Remove Alias
==============
Alias: QBERT.C10 Path: http://www.colorcomputerarchive.com/coco/MC-10/Cassettes/Games/Jim%20Gerrie's%20Games/QBERT.C10pyDriveWire has experimental printing support.
pyDriveWire v0.3 included experimental printing support. The -x printer command line option enables it. This support was enhanced in pyDriveWire v0.5:
dw printer flush command was added to spit out the current print bufferMikeyN6IL's Dev VLOG $09: Printing with pyDriveWire
Printing support requires the reportlab module. This module can be installed with pip:
pypy -m pip install reportlabMost of the standard Nitros9 DriveWire builds have printing support built in. Any program that uses the standard /P printing device will work just fine. A simple example for testing:
dir >/PThe console log will explain where the output PDF went:
DWServer: Enabling experimental printing support
Printing: opening print buffer: /var/folders/1y/cjrxv35d76bc54myg7hy7k1c0000gn/T/tmp2zG0Pb.txt
Printing to: /var/folders/1y/cjrxv35d76bc54myg7hy7k1c0000gn/T/tmpWdKRQY.pdf
Printing: closing print buffer: /var/folders/1y/cjrxv35d76bc54myg7hy7k1c0000gn/T/tmp2zG0Pb.txt
Sample: printing_sample.pdf
Robert Gault has written some code to redirect printing in BASIC to the DriveWire Printer.
Full Thread: Printing from Disk Extended Color Basic (via Drivewire)
Donwload: Drivewire Printing With Disk Basic(Robert Gault).zip
MCX-Basic has support for printing over a EmCee connection. You can use both the LLIST and PRINT #-2 commands to send output to the print buffer. One thing that MCX-Basic does not have is any way to signal to the EmCee server that it has finished printing. The dw printer flush command will close the current print buffer, render the output, and finally the print buffer will be reset to prepare for the next print job.
-x printer          Enable experimental printing support

printer:
  Printer Options

  --print-format {pdf,txt}
                    Printer output format, default: pdf
  --print-dir PRINTDIR  Spool directory to send printer output, default: /tmp
  --print-prefix PRINTPREFIX
                    File name prefix for files in the spool directory,
                    default: cocoprints
  --print-file PRINTFILE
                    File to send printer output, Note: Will be overwritten
--print-cmd PRINTCMD Command to run on flushed printer outputoption experimental printer
option printFormat <txt|pdf>
option printDir <dir>
option printPrefix <prefix>
option printFile <file>
option printCmd <cmd>dw printer format <txt|pdf>
dw printer dir <dir>
dw printer prefix <prefix>
dw printer file <file>
dw printer command <cmd>The printing feature is currently experimental. The reason why is that it currently requires some additional modules to be installed in your Python installation. It can be enabled by providing the -x printer command line or experimental printer option in the configuration file.
pdf or txt output formatThe pyDriveWire printing engine has two output formats:
pdf engine currently renders the Coco's textual printed output in a PDF file. The PDF file uses a font which is similar to Epson FX-80 printer.txt engine copies the Coco's textual printed output directly to a file without any conversion.pyDriveWire has a simple built-in print spooler. By default without any options the spool directory is a temporary directory such as /tmp. The print spooler automatically creates spool files using the printPrefix option as the prefix of the filename followed by a number. The default prefix is cocoprints so the files would be cocoprints0001.pdf, cocoprints0002.pdf, etc. A log message with the output file name is printed to the pyDriveWire console for at the end of each print job. You can run the command dw printer status to see the current configuration. There are four options which can be used to change this behavior:
printDir option can be used to provide a directory where the print engine output will go. This directory must already exist. The default is a temporary directory such as /tmpprintPrefix option sets the filename prefix for spool files. The spool files are automatically created using the printPrefix option as the prefix of the filename followed by a number. The default prefix is cocoprints so the files would be cocoprints0001.pdf, cocoprints0002.pdf, etc.printFile option is the name of a file where all of the printer output will go. This file is created the first time the Coco/MC-10 prints anything. The file is closed when the print buffer is flushed. Please note that if anything more is printed after this file is created, it will be truncated and overwritten and the previous output will be lost.pyDriveWire has an option to run a command on the current print buffer each time it is flushed. The obvious way to use this is to have the output file sent to a program that will actually print it out. The traditional command used to accomplish this any Linux/macOS/Unix system is lpr. The command works like this:
For example, if the following option is provided:
--print-cmd 'lpr -P cocofilter'Then whenever the print buffer is flushed the following command would be run:
lpr -P cocofilter <spool_file>For Windows you might try this:
--print-cmd "print" pyDriveWire v0.6 adds SSH support to the Virtual Serial Terminals. This allows one to run any a DriveWire Terminal program such as DWTerm or any terminal program under NitrOS-9 and make outbound SSH connections.
** NOTE: SSH is an experimental feature and must be enabled by command line or config file **
MikeyN6IL's Dev VLOG $0A: SSH On the CoCo with pyDriveWire
pip install cryptography ecdsa paramikoUse one of the following methods to enable SSH Support:
-x sshor
--experimental sshoption experimental sshYou can issue the following command from your DriveWire enabled terminal program to see whether SSH support is enabled:
ssh
FAIL Ssh is not enabled, use: -x ssh
If you see the message above, SSH support is not enabled. Please see the sections above to enable it.
If ssh has been enabled you will see:
ssh
FAIL Usage: ssh <hostname>[:<port>] <username> <password>There are two different ways to make SSH connections from your DriveWire enabled terminal program.
ssh <hostname>[:<port>] <username> <password>ATDssh://<username>:<password>@<hostname>[:<port>]dw port showThe last line of the output shows the current SSH parameters
Term: ansi Rows: 16 Cols: 32dw port term vt100dw port rows 24dw port cols 80pyDriveWire server has extremely powerful debugging capabilities. These far surpass what is available in any other DriveWire server out there in both conciseness, readability, and utility.
pyDriveWire has 3 levels of debugging:
The Debugging option on the command line or config file is global and is applied to All Instances.
Note: The config file option must be put in the first instance.
No debugging commands are sent on the pyDriveWire Console. This is the default if no debugging option or command is specified.
You may also specify this in the config file:
option debug 0This debugging level displays one line for each command the DriveWire or EmCee client sends to the server. See the pyDriveWire Debugging Guide for more detail.
-doption debug 1If you typed DIR at a HDBDOS prompt you might see something like this:
cmd=d2 cmdReadEx disk=0 lsn=322 rc=0 f=
cmd=d2 cmdReadEx disk=0 lsn=307 rc=0 f=
cmd=d2 cmdReadEx disk=0 lsn=308 rc=0 f=
cmd=d2 cmdReadEx -- This is the DriveWire Command that the client sent to the server. In this case it's a READEX commanddisk=0lsn=322rc=N and 0 means Success.This debugging level includes command debug level 1 and in addition to that displays a HexDump of every byte the pyDriveWire server sends and receives from the client. This can be extremely verbose and slows down the pyDriveWire server slightly so it is not recommended for normal use. See the pyDriveWire Debugging Guide for more detail.
-ddoption debug 2Debug Level 2 includes level 1 debugging and is even more verbose:
socket read: <dwsocket.DWSocketServer instance at 0x0000000107cfef20> len: 1
0000: |d2                               | |.                |
socket read: <dwsocket.DWSocketServer instance at 0x0000000107cfef20> len: 4
0000: |00000142                         | |...B             |
socket write: <dwsocket.DWSocketServer instance at 0x0000000107cfef20> len: 256
0000: |ffffffffffffffff ffffffffffffffff| |........ ........|
0010: |ffffffffffffffff ffffffffffffffff| |........ ........|
0020: |ffffffffffffffff ffffffffffffffff| |........ ........|
0030: |ffffffffffffffff ffffffffffffffff| |........ ........|
0040: |ffffffffffffffff ffffffffffffffff| |........ ........|
0050: |ffffffffffffffff ffffffffffffffff| |........ ........|
0060: |ffffffffffffffff ffffffffffffffff| |........ ........|
0070: |ffffffffffffffff ffffffffffffffff| |........ ........|
0080: |ffffffffffffffff ffffffffffffffff| |........ ........|
0090: |ffffffffffffffff ffffffffffffffff| |........ ........|
00a0: |ffffffffffffffff ffffffffffffffff| |........ ........|
00b0: |ffffffffffffffff ffffffffffffffff| |........ ........|
00c0: |ffffffffffffffff ffffffffffffffff| |........ ........|
00d0: |ffffffffffffffff ffffffffffffffff| |........ ........|
00e0: |ffffffffffffffff ffffffffffffffff| |........ ........|
00f0: |ffffffffffffffff ffffffffffffffff| |........ ........|
socket read: <dwsocket.DWSocketServer instance at 0x0000000107cfef20> len: 1
0000: |ff                               | |.                |
socket read: <dwsocket.DWSocketServer instance at 0x0000000107cfef20> len: 1
0000: |00                               | |.                |
cmd=d2 cmdReadEx disk=0 lsn=322 rc=0 f=
socket write: <dwsocket.DWSocketServer instance at 0x0000000107cfef20> len: 1
0000: |00                               | |.                |
Decoding this:
d2 from the CoCo00000142 from the CoCoff from the CoCo00 from the CoCo00 to the CoCoIf you really want to learn the internal details of how the DriveWire Protocol works read the manual!
DriveWire4 added a "HDB-DOS" mode to better support HDB-DOS disk images. pyDriveWire has enhanced support for this.
This is not the easiest DriveWire feature to understand and use properly. To use it successfully you will need to know a few peices of information about your disk image
pyDriveWire has 2 options:
hdbdos modeoffsetPlease note that HDB-DOS mode is not exactly what you may think at first glance.
For most HDB-DOS hard drives images the offset is 0 and hdbdos should be disabled.
For most HDB-DOS hard drives images the offset is 0 and hdbdos should be disabled.
For Combined NitrOS-9/HDB-DOS Drive images you will need to know two peices of information to get pyDriveWire configured properly.
These types of hard drive images are normally 128MB in size and divided into two sections, the first for NitrOS-9, and the second for HDB-DOS.
The NitrOS-9 section normally starts at the beginning of the drive at sector 0 through sector 0x59FFF. This yeilds an approximately 94MB NitrOS-9 file systyem.
The HDB-DOS section follows the NitrOS-9 section. The starting sector of this section immediately follows the NitrOS-9 section which is normally sector 0x5A000.
Lastly, you need to know whether your HDB-DOS ROM has been patched or not.
If your HDB-DOS ROM has NOT been patched, you will need to set an offset in the server to access the HDB-DOS section of the Disk. Note that you will need to disable this server offset in order to use NitrOS-9:
dw disk insert 0 /demo/combined.vhd
dw disk offset 0 0x5a000
If your HDB-DOS ROM has been patched, you DO NOT need to set an offset as it is built-into the ROM image itself:
dw disk insert 0 /demo/combined.vhd
dw disk offset 0 0Now we'll describe the HDB-DOS mode in DriveWire/pyDriveWire.
There is a specific case where this is useful. Suppose that you downloaded a 160k floppy disk image from the Color Computer Archive and you wanted to transfer this image to a physical disk and your machine is running HDB-DOS. The way that you can accomplish this is by using the HDB-DOS mode in DriveWire/pyDriveWire.
pyDriveWire has the hdbdos mode disabled by default. In this default mode, HDB-DOS selects which image it wants by the sector offset rather than the drive number (See Below: Understanding Hard Drive Images). The drivewire drive is selected by the DRIVE# command, and the default is 0. With hdbdos mode disabled, if you accessed DRIVE#0: DRIVE 4 you would be accessing DriveWire image mounted in slot 0 at sector 2520.
When the hdbdos setting is set to true this behavior is changed. HDB-DOS will still select drive 4 by sector offset but pyDriveWire determines the drive number by dividing this back out and in this case pyDriveWire will then access virtual disk iamge 4.
On your color computer if you issue the DRIVE ON command this enables the physical floppy disks on Drive 0-3. DriveWire drives 0-3 are not accessible again until you issue DRIVE OFF.
Then if you wanted to copy the downloaded disk image to a physical floppy you could insert the drive image in pyDriveWire drive 4 and then copy it:
dw server hdbdos True
dw disk insert 4 /path/to/disk/image.dsk
dw disk offset 4 0

DRIVE ON
BACKUP 4 to 0Each standard RSDOS disk is composed of 35 Tracks each containing 18 sectors for a total of 630 sectors on each disk.
HDB-DOS was designed to work with Hard Drives which are many multiples the capacity of a floppy disk. HDB-DOS allowed for multiple drives to reside on one hard drive. The way that it did this was by placing the drive images sequentially on the disk one after the other:
 HDB-DOS Hard Drive Layout

+--- RS-Dos Drive Sector
|
|   +============+===========+===}   {===+=============+=============+=============+
+-> |0        629|0       629|           |0         629|0         629|0         629|
    |            |           |           |             |             |             |
    |  Drive 0   |  Drive 1  |  .......  |  Drive 243  |  Drive 254  |  Drive 255  |
    |            |           |           |             |             |             |
+-> |0        629|630    1259|           |159390 160019|160020 160649|160650 161279|
|   +============+===========+===}   {===+=============+=============+=============+
|
+--- Hard Drive LSN
Drive 0: Starts at sector 0 at the beginning of the drive through sector 629 Drive 1: Sector 630 - 1259 Drive 2: Sector 1260 - 1889, Etc.
To swtich between the different drives, you simply issued the DRIVE N command. Internally, HDB-DOS uses a very simple formula to calculate which sector it needs to go to:
HardDiskLSN = <OFFSET> + <DRIVE>*630 + <sector>For the moment, assume that OFFSET=0
The RS-DOS directory and FAT tables are on the first few sectors of Track 17 of each disk (Sectors 306, 307, and 308)
To access the directory of Drive 0: 306 = 0*630 + 0 + 306
and for Drive 1: 306 = 1*630 + 0 + 306
etc.
 Combined NitrOS-9 and HDB-DOS Hard Drive Layout

                                           +--- RS-Dos Drive Sector
                                           |
    +======================================+============+===}   {===+=============+
    |                                      |0        629|           |0         629|
    |                                      |            |           |             |
    |           NitrOS-9 Image             |  Drive 0   |  .......  |  Drive 255  |
    |                                      |            |           |             |
+-> |0                                59FFF|5A000       |           |8138A   815FF|
|   +======================================+============+===}   {===+=============+
|
+--- Hard Drive LSNpyDriveWire provides a flexible system for configuring which directories you want to use. There is also a filename alias system available for use with the EmCee, DLOAD, and NamedObject support.
pyDriveWire can be configured to operate out of diffferent directories depending on which features you are using.
At initial startup, all of the directories are the same. They are initially set to the path where the pyDriveWire server is running. You can check what the directories currently are set to by issuing either the pwd or dw server pwd commands. Example:
pyDriveWire>  dw server pwd
Current Dir: /home/n6il/Development/Python/pyDriveWire
dw Dir: /home/n6il/Development/Python/pyDriveWire
mc Dir: /home/n6il/Development/Python/pyDriveWire
dload Dir: /home/n6il/Development/Python/pyDriveWire
namedobj Dir: /home/n6il/Development/Python/pyDriveWire
Note: issuing the pwd command will yield exactly the same output.
The commands below set the default directory for various types of pyDriveWire server operations. If you ask pyDriveWire to open a file without specifying a full path name to the file. Example:
pyDriveWire>  dw server setdir ~/demo
dw SetDir: /home/n6il/demo
pyDriveWire>  dw disk insert 0 DWTERM.dsk
Opened: disk=0 file=DWTERM.dsk stream=False mode=rb+
open(0, DWTERM.dsk)
The above example takes advantage of the fact the dw server setdir command was run to set the default directory for DriveWire Disk Operations to /home/n6il/demo After doing this when we ask the server to attach DWTERM.dsk to drive 0, it will look in this default directory for this file.
Default directories can be set for the following pyDriveWire operations:
dw server pwd or pwddw server setdir <path>dw server getdirdw server dirmc setdir <path>mc getdirmc listdirdload setdir <path>dload getdirdload listdirnamedobj setdir <path>namedobj getdirnamedobj listdirdw server pwdpwdBoth of the dw server pwd and pwd commands show a summary of the currently configured directories:
pyDriveWire>  pwd
Current Dir: /home/n6il/demo/dweebs
dw Dir: /home/n6il/demo
mc Dir: /home/n6il/demo/mc-10
dload Dir: /home/n6il/demo/dload
namedobj Dir: /home/n6il/demo/dweebs
dw server setdir <path>Use the dw server setdir <path> command to set the directory for DriveWire disk operations if a full path specification is not provided:
pyDriveWire>  dw server setdir ~/demo
dw SetDir: /home/n6il/demo
dw server getdirUse the dw server getdir command to get the directory for DriveWire disk operations:
pyDriveWire>  dw server getdir
dw GetDir: /home/n6il/demo
dw server dirUse the dw server dir command to set the directory for DriveWire disk operations:
pyDriveWire>  dw server dir

dload
dweebs
DWTERM.dsk
mc-10
mc setdir <path>Use the mc setdir <path> command to set the directory for EmCee protocol operations if a full path specification is not provided:
pyDriveWire>  mc setdir ~/demo/mc10
mc SetDir: /home/n6il/demo/mc10
mc getdirUse the mc getdir command to get the default directory for EmCee protocol operations:
pyDriveWire>  mc getdir
mc GetDir: /home/n6il/demo/mc10
mc listdirUse the mc listdir command to list the files the current directory for EmCee protocol operations:
pyDriveWire>  mc listdir
==== mc Dir Listing ===
Dir: /home/n6il/demo/mc-10
---
BOMSQUAD.C10
dload setdir <path>Use the dload setdir <path> command to set the directory for DLOAD protocol operations if a full path specification is not provided:
pyDriveWire>  dload setdir ~/demo/dload
dload SetDir: /home/n6il/demo/dload
dload getdirUse the dload getdir command to get the directory for DLOAD protocol operations:
pyDriveWire>  dload getdir
dload GetDir: /home/n6il/demo/dload
dload listdirUse the mc listdir command to list the files the current directory for DLOAD protocol operations:
pyDriveWire>  dload listdir
==== dload Dir Listing ===
Dir: /home/n6il/demo/dload
---
HELLO.BAS
TEST.BIN
namedobj setdir <path>Use the namedobj setdir <path> command to set the directory for DriveWire Named Object operations if a full path specification is not provided:
pyDriveWire>  namedobj setdir ~/demo/dweebs
namedobj SetDir: /home/n6il/demo/dweebs
namedobj getdirUse the namedobj getdir command to set the directory for DriveWire Named Object operations:
pyDriveWire>  namedobj getdir
namedobj GetDir: /home/n6il/demo/dweebs
namedobj listdirUse the namedobj listdir command to list the files the current directory for DriveWire Named Object operations:
pyDriveWire>  namedobj listdir
==== namedobj Dir Listing ===
Dir: /home/n6il/demo/dweebs
---
AUTOLOAD.DWL
DW
SAVE
DOSpyDriveWire> pwd
Current Dir: /home/n6il/demo/dweebs
dw Dir: /home/n6il/demo
mc Dir: /home/n6il/demo/mc-10
dload Dir: /home/n6il/demo/dload
namedobj Dir: /home/n6il/demo/dweebsThe pyDriveWire server has a powerful "aliasing" system that is quite different than the official EmCee servers. The pyDriveWire system has three different types of aliases. File and Web Aliases can be with LOAD/SAVE commands and Path Aliases can be used with DIR/SETDIR commands. The official servers can only use aliases for the SETDIR command.
In the pyDriveWire server all alias names are converted to upper case. For example if you had an alias like this one:
Server Aliases
==============
Alias: DWTERM.WAV Path: /demo/dwterm.wav
The case of the alias requested from the MC-10 is always converted to upper case so any of the following would load the same alias:
LOADM "DWTERM.WAV"LOADM "dwterm.wav"LOADM "DwTeRm.WaV"The PyDriveWire Server supports the following types of Aliases:
A web alias is an alias to a HTTP URL. When the MC-10 requests the alias using a LOAD or LOADM command the URL which the alias points to will be downloaded to a temporary file and then opened normally. Note that you won't see the actual file name, and when the file is closed the temp file will be automatically deleted.
A path alias is an alias to a directory. Path aliases can be used with DIR or SETDIR commands to change to the directory pointed to by the alias.
A file alias points to a file. Full or relative pathnames could be used. When the MC-10 requests the the alias the path to which the alias points to will be used and opened normally.
See the help for mc alias show for an example.
mc alias showShow the currently installed aliases:
Server Aliases
==============
Alias: POKER.C10 Path: http://www.colorcomputerarchive.com/coco/MC-10/Cassettes/Games/Jim%20Gerrie's%20Games/POKER.C10
Alias: DEMO Path: /demo
Alias: DWTERM.WAV Path: /demo/dwterm.wav
Explanation of example Aliases:
POKER.C10 -- This is a web alias -- LOAD "POKER.C10"DEMO -- This alias is a directory alias -- SETDIR "DEMO"DWTERM.WAV -- This is a file alias -- LOADM "DWTERM.WAV"mc alias add <alias> <path>Adds the requested alias with path as the destination. The alias is always converted to upper case before addition lookup. The path that an alias points to is case sensitive. Spaces and punctuation are permitted.
Add a Web Alias:
pyDriveWire>  mc alias add poker.c10 http://www.colorcomputerarchive.com/coco/MC-10/Cassettes/Games/Jim%20Gerrie's%20Games/POKER.C10
Add Alias
==============
Alias: POKER.C10 Path: http://www.colorcomputerarchive.com/coco/MC-10/Cassettes/Games/Jim%20Gerrie's%20Games/POKER.C10
Add a file alias:
pyDriveWire>  mc alias add dwterm.wav /demo/dwterm.wav
Add Alias
==============
Alias: DWTERM.WAV Path: /demo/dwterm.wav
mc alias remove <alias>Remove an alias. The alias is always converted to upper case before addition removal.
pyDriveWire>  mc alias remove qbert.c10
Remove Alias
==============
Alias: QBERT.C10 Path: http://www.colorcomputerarchive.com/coco/MC-10/Cassettes/Games/Jim%20Gerrie's%20Games/QBERT.C10pyDriveWire supports the DLOAD protocol available in early versions of Color Basic. DLOAD can be used to download BASIC and Binary files to the CoCo.
NOTE: When DLOAD is enabled DriveWire communication is disabled. When DLOAD is disabled DriveWire is reenabled at the original baud rate
NOTE: It is not possible to use DLOAD and DriveWire on the same instance at the same time. Instances are however independent, so one instance can run DLOAD while others run DriveWire or EmCee protocols.
MikeyN6IL's Dev VLOG $0B: DLOADing with pyDriveWire
pyDriveWire> dload enable 1200Will switch on the DLOAD protocol at 1200 baud. You could put any baud rate you want there, but the CoCo only supports 300 (,0) and 1200 baud (,1)
Next you need to tell the pyDriveWire server where to look for the files the CoCo is asking for. The command for this is:
pyDriveWire> dload setdir /path/to/dload/filesNow if you placed a file named “FOO” in the /path/to/dload/files directory, you could either do:
CoCo: DLOAD “FOO”,1or
CoCo: DLOADM “FOO”,1to load the file in.
One drawback of the DLOAD protocol is that it only supports an 8 byte long file name. This pretty much means that file name extensions go out the window. While you could do:
mv FOO.BAS FOOor
mv FOO.BIN FOOEven though the two files are really different files you can only have one of them online at a time. pyDriveWire provides a way to manage this called “aliases”. You could set up aliases like this:
pyDriveWire> dload alias add FOOBAS FOO.BAS
pyDriveWire> dload alias add FOOBIN FOO.BIN
Now from the CoCo side you can load both files:
CoCo: DLOAD “FOOBAS”,1
CoCo: DLOADM “FOOBIN”,1
This is also handy for something that you load frequently, such as HDBDOS. You could create an alias for it and put it in your pydrivewirerc configuration file so it’s always there. What follows is a procedure to BootStrap HDBDOS on a CoCo2. pyDriveWire> dload alias add HDBDOS hdbdw3cc2.bin pyDriveWire> dload enable 1200
CoCo: DLOADM “HDBDOS”,1

pyDriveWire> dload disable

CoCo: EXEC
Now your Coco is running HDBDOS and since DLOAD is disabled DriveWire is enabled again!
It is possible to use DLOAD from inside of MAME. The general workflow looks like this:
+-------------------------------------------------------+
|                MAME                                   |
|                                                       |
| +------------+      +----------- +      +-----------+ |    TCP/IP     +-------------+
| |   CoCo1/2  +----->| null_modem |----->| bitbanger |----> socket --->| pyDriveWire |
| +------------+      +----------- +      +-----------+ |               +-------------+
|                                                       |
+-------------------------------------------------------+
Here is the general recipe for how to do this:
pyDriveWire --accept --port 65504mame coco2 -rs232 null_modem -bitb socket.localhost:65504dload enable <baud>DLOAD or DLOADM command, WITHOUT any ,0 or ,1 on the end, just DLOAD"FOO" or DLOADM"NITROS9"| Baud | Constant |
|---|---|
| 300 | POKE &HE6,181 |
| 1200 | POKE &HE6,42 |
| 2400 | POKE &HE6,19 |
dload statusdload enable <300|1200>dload disabledload translatedload setdir <path>Use the dload setdir <path> command to set the directory for DLOAD protocol operations if a full path specification is not provided:
pyDriveWire>  dload setdir ~/demo/dload
dload SetDir: /home/n6il/demo/dload
dload getdirUse the dload getdir command to get the directory for DLOAD protocol operations:
pyDriveWire>  dload getdir
dload GetDir: /home/n6il/demo/dload
dload listdirUse the mc listdir command to list the files the current directory for DLOAD protocol operations:
pyDriveWire>  dload listdir
==== dload Dir Listing ===
Dir: /home/n6il/demo/dload
---
HELLO.BAS
TEST.BIN
dload alias showdload alias add <name> <path>dload alias remove <name>namedobj setdir <path>Use the namedobj setdir <path> command to set the directory for DriveWire Named Object operations if a full path specification is not provided:
pyDriveWire>  namedobj setdir ~/demo/dweebs
namedobj SetDir: /home/n6il/demo/dweebs
namedobj getdirUse the namedobj getdir command to set the directory for DriveWire Named Object operations:
pyDriveWire>  namedobj getdir
namedobj GetDir: /home/n6il/demo/dweebs
namedobj listdirUse the namedobj listdir command to list the files the current directory for DriveWire Named Object operations:
pyDriveWire>  namedobj listdir
==== namedobj Dir Listing ===
Dir: /home/n6il/demo/dweebs
---
AUTOLOAD.DWL
DW
SAVE
DOS
namedobj alias shownamedobj alias add <name> <path>namedobj alias remove <name>The DosPlus Extender for Dragon computers has DriveWire support. The extender has been implemented for DriveWire servers which do not provide proper support for VDK files. When the Dragon makes a request for a particular LSN, the ReadEx and Write commands sent by the extender are actually LSN+1. This seems to be because other DriveWire servers do not have full support for the VDK disk image format. pyDriveWire will properly detect a VDK image file and never send the VDK header to the client. When pyDriveWire's dosplus mode is enabled the reverse LSN = LSN-1 is applied to correct this.
Note: The dosplus mode has no effect when using DWEEBS/DWLOAD
Note: The dosplus feature is needed for all disk Read/Write access being
done through the DosPlus extender, regardless of the disk image format you
are using (VDK, JVC, DSK, OS9)
MikeyN6IL's Dev VLOG $0C: pyDriveWire Does {Tano}Dragon{32,64}
There are three different ways to turn on the dosplus mode:
If you already know that pyDriveWire will used exclusively with Dragon(s) Running DosPlus you can set the --dosplus command line option. If you have multiple pyDriveWire instances, you can enable the dosplus mode on the instances which will be used with Dragon(s) Running DosPlus and/or disable it on other instances by adding the dw server dosplus <flag> option in the config section for those instance(s).
Commands added:
Insert a disk with the dosplus workaround enabled:
dw disk insert <drive> <path> --dosplusQuery whether dosplus is enabled for a drive:
dw disk dosplus <drive>
dw disk info <drive>
Change the dosplus flag for a given drive. This command can be issued at the pyDriveWire REPL prompt, Web command console, and can also be specified in your config file:
dw disk dosplus <drive> <setting>

Setting can be: 0, f[alse], n[o], off
                1, t[rue], y[es], on
Query the server global dosplus default:
dw server dosplusSet the dosplus flag for a specific instance. This command can be issued at the pyDriveWire REPL prompt, Web command console, and can also be specified in your config file for individual instances:
dw server dosplus <setting>

Setting can be: 0, f[alse], n[o], off
                1, t[rue], y[es], on
Enable the server global dosplus default from the command line:
./pyDriveWire --dosplus ...pyDriveWire has a system of "virtual ports" which can be used to communicate over the Internet. This is done in one of four ways: The DriveWire Virtual Modem, TCP commands, Telnet and SSH Commands.
pyDriveWire's Virtual modem provides a Hayes-like AT interface for making outgoing connections. To use it, you first must run some terminal software.
/n for the port, baud doesn't matterOnce you have your terminal program loaded and running you will be greeted with a blank screen. To ask pyDriveWire to open the virtual modem port, initiate a simple AT command and you should get an OK back in response:
AT
OK
ATI
pyDriveWire v0.6
OK
So, anyone remember how to make a modem connection using a modem? How about that ATDT command. Except instead of a phone number you can use an IP address or DNS name.
ATDT<host>
ATDT<host>:<port>
ATDTtelnet://<host>[:<port>]
ATDTssh://<username>:<password>@<hostname>[:<port>]
The first one will use the default Telnet port 23. If you need to use a different port you can specify the port number after the colon (:) You can also make telnet and ssh connections as shown above.
telnet and ssh CommandsYou can also use the telnet and ssh commands at the pyDriveWire> REPL prompt. Just Press Enter first
<Press Enter>
pyDriveWire> telnet <host>[:port]
pyDriveWire> ssh <hostname>[:<port>] <username> <password>When SSH Connections are made some parameters such as your terminal type and screen size are sent to the remote end. The default settings are:
These can be controlled using the following commands:
  dw port term [<term>]
  dw port rows [<rows>]
  dw port cols [<cols>]
Note that the parameters to the above commands is optional. If you don't supply the parameters the current value of the setting will be shown. These commands can be placed in your .pydrivewire config file if you want them to be remembered.
You can also see the current settings with the following command:
pyDriveWire>  dw port show


Port   Status
-----  --------------------------------------

Term: ansi Rows: 16 Cols: 32
You can also set these from the command line:
  --port-term PORTTERM  Port default TERM, default: ansi
  --port-rows PORTROWS  Port default rows, default: 16
--port-cols PORTCOLS Port default cols, default: 32pyDriveWire has many extensions and enhancements compared to the standard DriveWire4 server. Some of the extensions are on permanently, others can be enabled by command line, config file, or server commands. Still others are experimental features. The DriveWire 4 protocol provides extremely rudimentary ability to tell the client which protocol version the server supports. Other information may be available by using server commands, but using server commands requires at least 100 lines of assembly code just to run one command and to parse the results. pyDriveWire provides an extension which clients can use to determine the server version, which features are available and which features are currently enabled. This is done in a way which is backwards compatible with the DriveWire 4 specification.
pyDriveWire provides enhanced information to clients by use of a combination lock mechanism. Once the client has activated the combination lock the client can request an individual page(byte) of information from the server and then the lock is closed again. The combination lock must be activated for each individual page desired.
| Lock Code | Supported Servers |
|---|---|
py |
pyDriveWire v0.6 and later |
pyDriveWire's Combination Lock is activated as follows:
OP_DWINIT command bytep lock combination byte #1p. A pyDriveWire server returning $FF does not
support this extension.OP_DWINIT command bytey lock combination byte #2y. A pyDriveWire server returning $FF does not
support this extension.OP_DWINIT command byteThe combination for pyDriveWire's lock is the byte 'p' followed by 'y'. Other DriveWire servers may add their own combination lock and provide their own information.
If a DriveWire server does not support this extension then it will simply return the default value that it normally would for that server. This is how the client can determine what type of server it is communicating with and whether the extension is available or not.
| Server | Return Values |
|---|---|
| DriveWire 2 or 3 | No reply |
| DriveWire 4 | $0404 |
| pyDriveWire and earlier | $FFFF |
| pyDriveWire v0.6 and later | py |
If the client finds the values returned do not match the combo lock then the server does not support this combo lock extension.
Information pages are called up by the client sending a byte for the desired information page. The following pages are reserved and shall not be used by any server:
The bytes $10 through $EF represent valid requests for information pages.
Block Transfers - The server returns data in a similar manner to NamedObjects. The server presents the data on one of the DriveWire drives and returns the drive number and the data length in bytes to the client. The client can then issue the required number of OPREAD or OPREADEX calls to obtain the data.
pyDriveWire defines the following information pages:
| Page | Description |
|---|---|
| 'E' | Enabled Features, page 1 |
| 'e' | Enabled Features, page 2 |
| 'F' | Available Features, page 1 |
| 'f' | Available Features, page 2 |
| 'V' | Server Version page 1 |
| 'v' | Server Version page 2 |
Page Data Type: byte
Supported Servers:
| Bit | Description |
|---|---|
| 7 | Reserved |
| 6 | PlaySound Support |
| 5 | SSH Support |
| 4 | Printing Support |
| 3 | DosPlus Mode |
| 2 | HDBDos Mode |
| 1 | DLOAD Protocol |
| 0 | EmCee Protocol - always 1 |
Page Data Type: byte
Supported Servers:
| Bit | Description |
|---|---|
| 7 | Reserved |
| 6 | |
| 5 | |
| 4 | |
| 3 | |
| 2 | |
| 1 | |
| 0 |
Page Data Type: byte
Supported Servers:
| Bit | Description |
|---|---|
| 7 | Reserved |
| 6 | PlaySound Support |
| 5 | SSH Support |
| 4 | Printing Support |
| 3 | DosPlus Mode |
| 2 | HDBDos Mode |
| 1 | DLOAD Protocol |
| 0 | EmCee Protocol - always 1 |
Page Data Type: byte
Supported Servers:
| Bit | Description |
|---|---|
| 7 | Reserved |
| 6 | |
| 5 | |
| 4 | |
| 3 | |
| 2 | |
| 1 | |
| 0 |
Page Data Type: byte
Supported Servers:
| Bits | Description |
|---|---|
| 4-7 | Major Version - binary 0-15 |
| 0-3 | Minor Version MSB - BCD 0-9 |
Page Data Type: byte
Supported Servers:
| Bits | Description |
|---|---|
| 4-7 | Minor Version LSB - BCD 0-9 |
| 0-3 | Sub Version |
Sub Version
| Value | Code |
|---|---|
| 0 | None |
| 1 | a |
| 2 | b |
| ... | |
| 15 | o |
dw disk
dw disk showdw disk insert <drive> <file>dw disk eject <drive>dw disk reset <drive> -- (re-open)dw disk offset <drive> <n>dw disk create <drive> <offset>dw port
dw port showdw port close <n>dw port debugdw port termdw port rowsdw port colsdw server
dw server instancedw server dir [<path>]dw server list <file>dw server dumpdw server debug <0|False|1|False>dw server timeoutdw server versiondw server conn debug <0|False|1|False>dw server hdbdos <0|False|1|True>dw instance
dw instance showdw instance adddw instance selectdw printer
dw printer flushdw printer formatdw printer filedw printer dirdw printer cmddw printer statustcp commands
tcp connect <host> <port>tcp listen <port> ... -- Remainder of options ignoredtcp join <channel>tcp kill <channel>ATATD<host>:<port>ATDT<host>:<port>ATEATHATIATOATZmc alias showmc alias addmc alias removemc setdirmc getdirmc showmc ejectdw port debug [True|1|False|0]dw server debug [True|1|False|0]dw server conn debug [True|1|False|0]dw server dumpdw server timeout <s>ssh <hostname>[:<port>] <username> <password>ATDssh://<username>:<password>@<hostname>[:<port>]dw port showdw port termdw port rowsdw port colsdload Commands
dload alias showdload alias adddload alias removedload statusdload enabledload disabledload setdirdload getdirdload listdirdload translateplaysound Commands
playsound alias showplaysound alias addplaysound alias removeplaysound setdirplaysound getdirplaysound listdirplaysound playplaysound stop